A Step-by-Step Guide to Paying Bills in QuickBooks Online
Running a business involves ongoing expenses. As bills come in from vendors and service providers, you need an efficient system to track and pay them QuickBooks Online makes the process smooth and simple Just follow this guide to master bill payment in a few easy steps.
Getting Started with Bill Management
The first step is understanding the difference between bills, expenses, and checks in QuickBooks.
Bills are unpaid expenses that you plan to pay later Expenses are purchases you’ve already paid for Checks are a specific payment method,
By using the right transaction type, QuickBooks can accurately track what you owe and what’s been paid.
You’ll find all bills and expenses under Expenses. Go to the Bills tab to see unpaid bills ready for payment.
Adding Bills
When you receive a bill, add it to QuickBooks right away. This puts it on your radar for payment down the road.
Go to Expenses > Bills and click +New > Bill. Select the vendor from the dropdown.
Enter key details like due date, bill number, and amount owed. Pick the expense account like Utilities or Office Supplies. Add products/services if you want to itemize.
You can also upload a bill by going to +New > Upload. Just drag in a PDF or photo of the bill.
Review bills under the For Review tab. Correct any errors, then hit Save. This moves bills to the Unpaid tab.
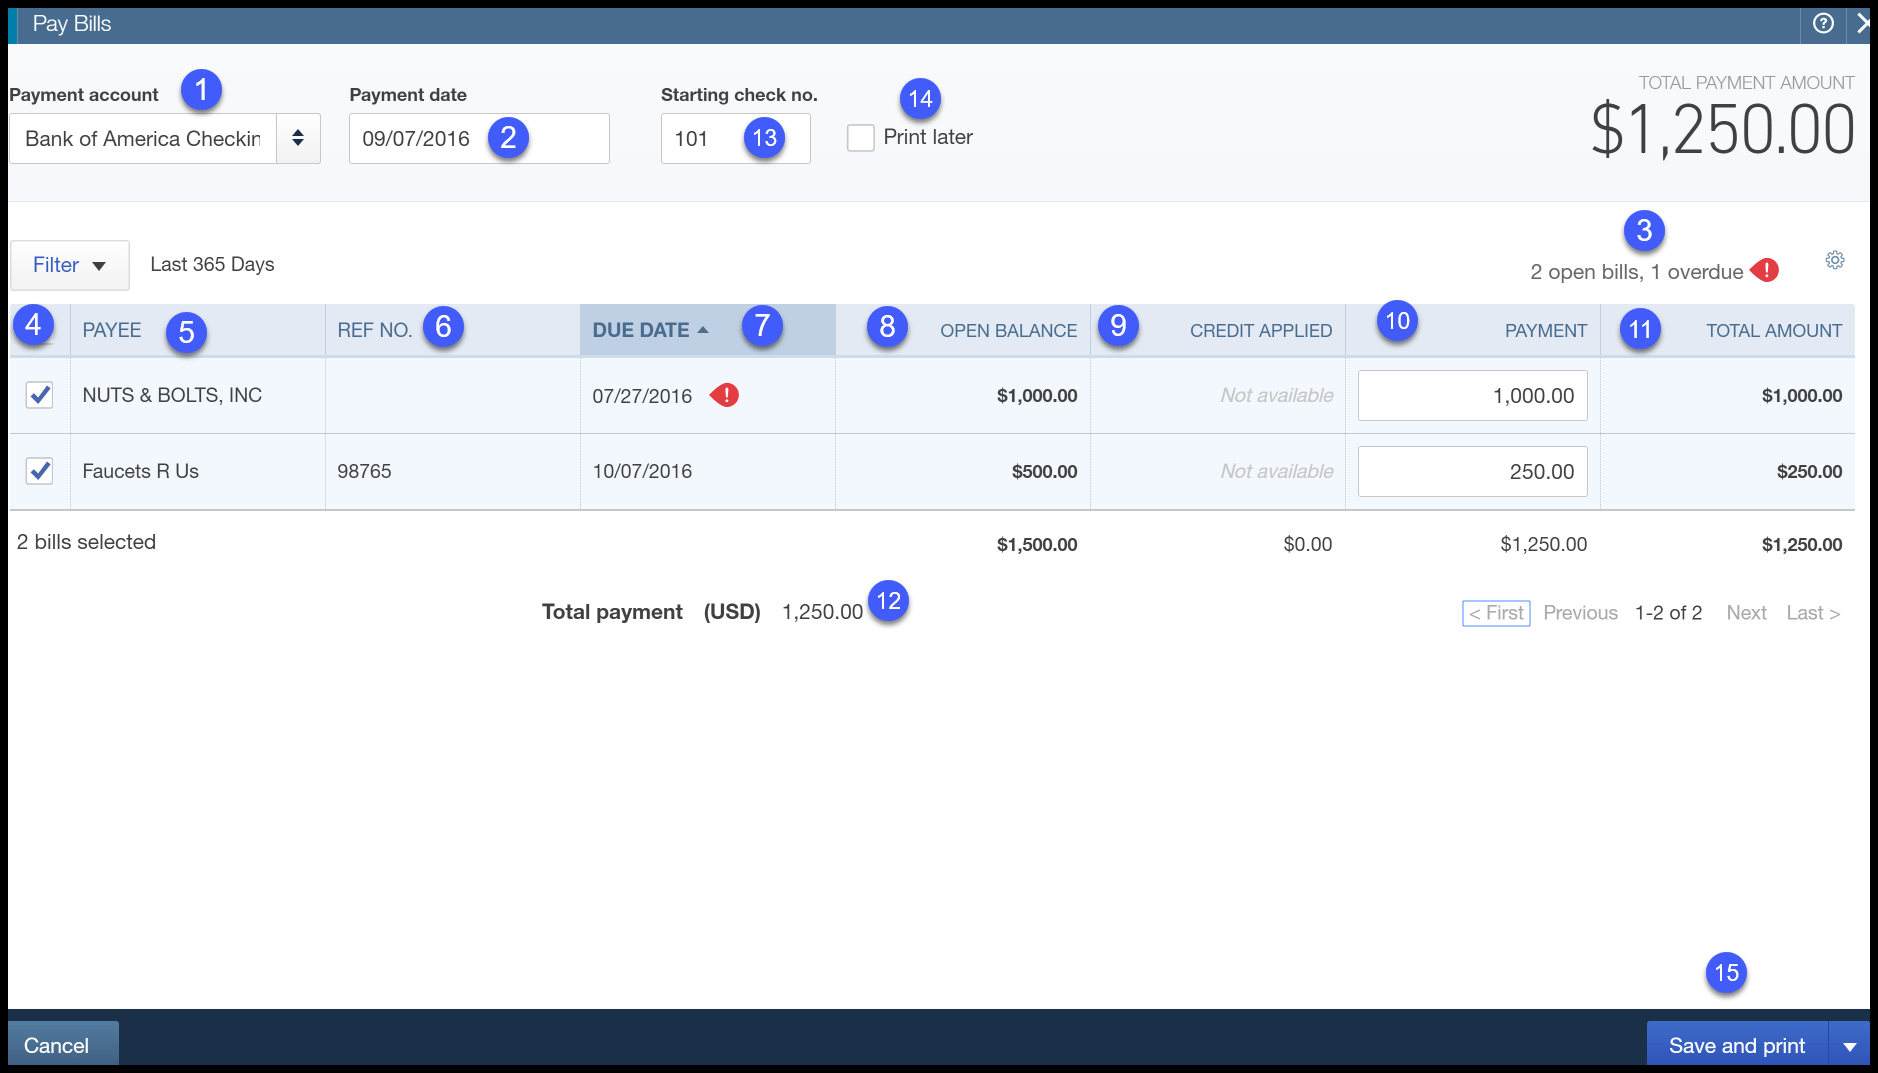
Paying Bills
To pay a bill, you have several options:
- Schedule online payment via QuickBooks Bill Pay
- Record an offline payment you already made
- Enter a check, credit card, or cash transaction
Using Bill Pay
Connect your bank account to use QuickBooks Bill Pay. Under Unpaid Bills, choose Schedule Payment. Pick the account, date, amount and submit. The payment will process automatically on the schedule date.
You’ll see paid bills under the Paid tab. Bills stay linked to payments made through Bill Pay.
Recording Offline Payments
If you paid a bill away from QuickBooks, go to Unpaid Bills and choose Mark as Paid. Select the bill(s), enter payment info like date and amount, and save. This marks the bill paid without entering a check or other transaction.
You can also multi-select bills and batch mark them as paid.
Paying with Checks
When paying bills by check, use the Check transaction type. Go to +New > Check. Pick the vendor, add an open bill to the check, set the bank account, date, and amount. Save when done.
The bill will move to Paid status and link to the check payment transaction.
Paying with Credit Card or Cash
Go to +New > Pay Bills and pick the account you want to record payment from. Check the bill(s) paid, enter amounts, and save. This logs the payment without the need to enter a specific credit card or cash transaction.
Payment Tracking and Reporting
QuickBooks keeps everything tied together in the background. You can run reports on transactions, payments owed, and payments made.
The Balance Sheet shows unpaid bills under Accounts Payable. The Profit & Loss report shows bill expenses. Run the A/P Aging Summary to see upcoming due dates.
Stay on Top of Bills
By using QuickBooks Online to manage vendor bills, you can automate reminders, minimize late fees, and keep your accounts payable in check. Just enter bills as they arrive, then schedule online payments or record checks/cash transactions once paid. Easy bill tracking keeps your business finances smooth and stress-free.
Schedule multiple bill payments in one step
With QuickBooks Bill Pay, you can save time and schedule multiple bill payments in one step. Multiple bills scheduled to the same vendor will be combined into one payment.
To schedule multiple payments in one step:
- Sign in to your QuickBooks Online company file.
- Select Expenses, then Bills (Take me there).
- Create a new bill or go to your existing unpaid bills in the unpaid tab.
- Mark the bills you want to pay using the checkboxes to the left of each bill.
- Select Schedule payments.Note: You can also select New then Pay Bills, mark the bills you want to pay, and then select Schedule payments.
- Select the bank account you want to use as your funding source. If you don’t have an account, you can select Select account to add an account.
- If you want to update to a different bank account, select Change account.
- Select Manage for each payment to update the delivery details/withdrawal date. If the vendor already has delivery details, we’ll use them again.Note: If you update vendor details for one bill, the details will be updated for all other bill payments to the same vendor.
- If your vendor is a Payable Network Member, you don’t need to add this info. If the vendor’s QuickBooks Business Network info needs to be updated, you’ll need to contact your vendor to update their ACH payment info in their QuickBooks first. Then you can complete the payment.
- You can select apply to all to apply a withdrawal date to all payments in a batch.
- Select continue.
- Review the payment, then if everything looks correct, select Schedule payments.
You and your vendors will get email confirmations when bill payments are scheduled and processed. You can see the status of all your Bill Pay payments on the Bill Pay payments page, (Expenses then Bills) page.
How to cancel your Bill Pay subscription
- Sign in to your QuickBooks Online company file.
- Go to Settings
 and select Account and settings.
 - Select Billing & subscription.
- Find QuickBooks Bill Pay and select Unsubscribe.
How to add and pay bills in QuickBooks Online
FAQ
How do I pay bills in accounts payable in QuickBooks?
Go to the Suppliers menu, then select Pay Bills. Select the correct accounts payable account from the dropdown. Select the checkboxes of the bills you want to pay from the table. Note: To unmark or mark all the bills in the list, select Clear Selections or Select All Bills.
How do I pay bills online in QuickBooks?
All you need to do is enter your bank account information to pay bills online, directly inside QuickBooks. You can settle invoices, balance books, and schedule bill payments in real-time. First, you’ll decide how you’d like to complete the online payment. QuickBooks Checking: Use your QuickBooks Checking account to pay bills directly.
How do I remove a bill in QuickBooks Online?
If you delete a bill, it will no longer show up in Online Bill Pay, but it will still be listed in Expenses in QuickBooks Online. Login to your QuickBooks Online account. Navigate to the Pay bills onlinepage by any of the following: Select + New. Then, select Pay Bills Online Selecting the Bill Pay Online dashboard widget.
What happened to QuickBooks Desktop bill pay?
QuickBooks Desktop Bill Pay provided by Fiserv was retired on December 2, 2019. You’ll need to find an alternative solution to process online bill payments through QuickBooks Desktop. We encourage you to consult your bank or financial institution for other options.
